Tuesday, September 21, 2010

Chicken Pot Pie

I love meals that are homemade, but easy to make. It's always nice to have a few easy to throw together meals aside from boxed macaroni and cheese and hot dogs.

A few months ago I decided that I wanted to make chicken pot pie from scratch. I searched around online and found a Paula Deen recipe called "Hurry Up Chicken Pot Pie". I changed just a few things, based on personal taste, and it was awesome and easy to make. We always have all of the ingredients, except for the chicken, in the house so I can make this recipe without having to make a big shopping trip. The first time I made it, I used two small dishes so that Lucas and I could have individual servings, which was nice. But a single casserole means less dishes and more sharing :]


Hurry Up Chicken Pot Pie

Ingredients:
  • 2 chicken breasts, cut into 1 inch cubes
  • 1 1/2 cup instant biscuit mix
  • 1 cup milk
  • 1/4 cup butter (half a stick), melted
  • 1 can of cream of chicken soup
  • Salt and pepper, if desired
  • 1/2 cup frozen peas
  • 1/2 cup thinly sliced carrots (I used a vegetable peeler to make slices)
  • 1 cup chicken broth
Directions:
  1.  Preheat oven to 350 degrees F
  2. Cook pre-cut chicken
  3. Layer chicken, peas, and carrots in the bottom of either a 2 quart casserole or two 1 quart casserole dishes
  4. Mix together broth, cream of chicken soup, and salt and pepper (if desired) in a medium mixing bowl
  5. Pour broth and soup mixture over the layers of chicken, peas, and carrots
  6. Stir together biscuit mix and milk in a small mixing bowl
  7. Pour biscuit mix over top of casserole
  8. Pour melted butter over top of biscuit mix
  9. Bake for 30-40 minutes, until golden brown

This dish would be really good with other veggies too like broccoli or diced potatoes. You could also add herbs or garlic to it for a little more oomph.

Monday, September 20, 2010

Sunflowers

Here in Maryland, there are many farmers that plant entire fields full of beautiful sunflowers which pop up in the beginning of September. They're a pleasant surprise and are oh so nice to drive by each day. It's a nice little "good bye" to summer and "hello" to fall.

We live out in the sticks where there are many sunflower fields surrounding us. We see them when we travel north and when we travel south. For most of the month there are cars all along the road belonging to photographers and other people who are simply there to admire the flowers.

We went to visit the sunflowers and take pictures on Saturday as the beginning of our "half-year anniversary" celebration. Unfortunately, most of the sunflowers were sad and droopy. We did get plenty pictures of these little guys though:


They look like they really want to be big sunflowers like the rest. I think they're sweet.


This is my handsome husband being Mr. Photographer:


And this is my Mr. Photographer's handy work:

Friday, September 17, 2010

Tea Party

For my friend Laurie's birthday, we had a lovely little tea party. We sipped tea out of little china tea cups and ate some delicious treats that were all set on a lovely old linen tablecloth. It felt fancy and we all agreed that the tea tasted better out of those little tea cups.


I saw a recipe a few months ago for a triple layered pink lemonade cake and had been searching for a reason to make it ever since- the tea party seemed like the perfect occasion. I decided to make cupcakes instead of a layered cake, partly because our tiny little oven wouldn't allow me to bake more than one layer at a time, and partly because I liked the idea of the girls being able to just pick up their own individual serving in the form of a cute little cupcake.


They were the smoothest, moistest, prettiest cupcakes I ever made. They had a nice pink tint to them and were topped with an equally delicious lemon buttercream.


I highly recommend you make them too :]

Here is the original Pink Lemonade Cake recipe. You can simply cut the recipe in half to make them into cupcakes (makes 12). You could also leave the recipe as is and make 24 yummy cupcakes!


Also, I didn't use the buttercream from the original recipe, but made this version instead:

Lemon Buttercream Recipe

Ingredients:
  • 1/2 cup softened butter (1 stick) 
  • 1/4 cup Crisco/vegetable shortening
  •  2 cups confectioners' sugar
  • 3 teaspoons lemon extract
  • 1 teaspoon vanilla extract
Directions: 
  1. With a mixer, cream butter and Crisco together.
  2. Gradually add in confectioners' sugar until fully incorporated.
  3. Mix in vanilla and lemon extract.

Thursday, September 16, 2010

Fries 101

Yesterday we talked burgers, today we're talking fries.

Fries and burgers are a perfect pair. Unfortunately, the fries you get at fast food restaurants are usually soaked in grease and not really something you're likely to make at home. But, there is a healthier, fresher way to make fries.

Making fries at home is really simple. All you really need is a potato and a knife. You can cut your potato into wedges for more of a steak fry, or make slim fries. You also have the option of leaving the skin on or peeling it off.


To give your fries some crispiness, olive oil does the trick, plus you can use so many different spices to give your fries a little flavor. For my fries, I like using garlic powder, paprika, salt, and pepper (about a teaspoon of each). But, just salt and pepper alone can make yummy fries. Simply sprinkle the olive oil and spices over the cut potato fries and mix with your hands to evenly coat. Be careful not to add too much olive oil though or they'll get soggy. Unless, of course, you like soggy fries. I use about 1 1/2 tablespoons.


When you bake them, they should all be placed flat on the baking sheet so that they all get cooked evenly. Bake the fries at 400 degrees F for 30-40 minutes. The cooking time will depend on how thick your fries are. The ones pictured above took just 30 minutes.

Instead of regular potatoes, you could substitute sweet potatoes and make sweet potato fries. They'd be really good with melted cheese on top too!

Wednesday, September 15, 2010

Burgers 101


A couple of months ago we hosted a game of flashlight tag at the farm. Yes, I said flashlight tag, and it's still just as fun as when we were kids. Except, I'm a lot slower now. It was a really fun time and a really good excuse for me to make cook out food.

I had recently learned everything I'd want to know about hamburgers in the book Tips Cooks Love: Over 500 Tips, Techniques, and Shortcuts That Will Make You a Better Cook! and was excited to put my new knowledge into practice.

A lot of people use ground round beef, as that is what is most commonly packaged in grocery stories. Everyone differs in their preference of cut, but it seems that ground chuck is most preferred by cooks. It has a fat content of 20%, which makes very juicy burgers. To be honest, I usually use ground turkey when I'm cooking for my husband and I and beef for everyone else. Ground turkey just feels lighter and healthier, though it's not for everyone.

When I make burgers I usually add paprika, Worcestershire sauce, garlic or onion powder, and salt and pepper to the meat. For turkey burgers, it's also a good idea to add in bread crumbs and some olive oil to give moisture and hold the burgers together well. You can make a 2 inch burger as your tester to see if you need to increase your sauce or spices. When mixing together the meat and ingredients and when making the patties, make sure you don't over work the meat. Too much heat from your hands can remove the fat from the beef that gives it it's juiciness. After you make your patty, it's good to make a little dent in the center with your thumb to help the burger to cook fairly flat instead of puffing up into a ball. Also, try to to resist pushing the burgers down to make them cook quicker on the grill- this will squeeze out all those yummy juices.

Tomorrow we'll talk fries :]

Tuesday, September 14, 2010

Voting Day

Is it silly that I'm really excited about my first time voting as a Mrs.? Every first in our marriage, even something as mundane as voting together, is exciting to me.


Monday, September 13, 2010

Chicken Corn Chili

As a direct result of the colder weather moving in, my slow cooker will be making a regular appearance in my kitchen. It's time for stews, soups, and chili.

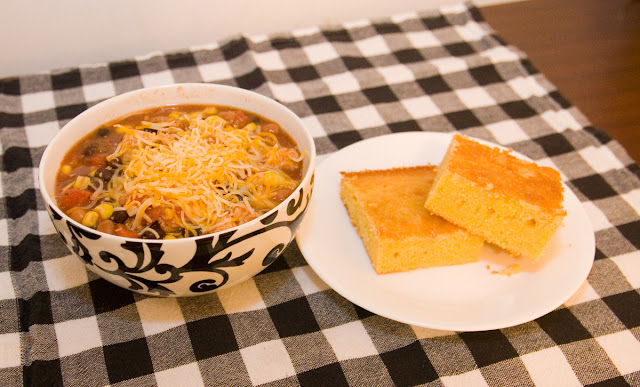
To be honest, chili never appealed to me much before, until I saw an episode of Giada at Home where she made some delicious looking chicken and corn chili. After I had Lucas look at the recipe, he was craving chili, but not exactly the way that Giada had prepared it. We looked through a few different chili recipes and picked out the ingredients that we liked best and I created my own version of chicken corn chili for dinner tonight.

It turned out to be really delicious, especially with a side of homemade cornbread. I'm happy to say that I am now a big fan of chili.


Chicken and Corn Chili Recipe

Ingredients:
  • 3 chicken breasts, cut into 1 inch cubes
  • 1 (16 oz) jar of salsa
  • 1 (14.5 oz) can diced tomatoes
  • 1 (4 oz) can diced green chili peppers
  • 2 diced garlic cloves
  • 2 teaspoons ground cumin
  • 2 teaspoons chili powder
  • 2 cups frozen corn
  • Salt and pepper to taste
  • 1 (15 oz) can pinto beans
  • 1 (15 oz) can black beans
Directions:
  1. Mix together all ingredients except for beans and corn in slow cooker.
  2. Cover and cook on low for 6-8hrs. 
  3. 30 minutes before the end of cooking, add corn and beans to the chili

(To add more heat, you could add red pepper flakes or increase the amount of chili powder)